Behind the Scenes Baby Photography With 50mm Lens
Jen here with another First Year post that is packed with tips on how to photograph baby with Christmas lights!
Last week's post featured several images of Logan discovering the beauty of those twinkling string lights many of us have on display in our homes during the holiday season. It was so much fun to capture those images, and I look forward to displaying framed prints of them in our home every Christmas season. This week, I am sharing with you my camera settings and things I took into consideration when creating my readers' favorite images, in hopes that you will feel inspired to capture Christmas light images of your own!
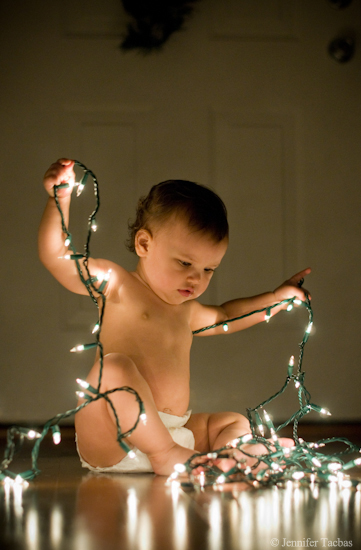
This image was the one I received the most questions about and on which I received the most compliments. I just love how Logan is picking up the lights and trying to figure it all out. Moments later, I received a big grin of approval!

Here is a behind-the-scenes look at how to photograph baby with Christmas lights and what went into creating this image…
Preparation
I wanted an image in which the only light source was a singular strand of white lights, so I turned off all the interior lights in the room and made sure the flash on my camera was off. I laid the strand of lights on the floor. While I laid most of the strand in front of her, I also laid part of the strand behind her. I wanted to see her whole outline, so having some light behind her helped to separate her from the background.
Location
Location is key when learning how to photograph baby with Christmas lights. I was quite strategic when selecting a location for this image, which was the entryway of our home. I wanted to have as much light on Logan as possible in the image. The entryway is a relatively tight space, with three light-colored walls and shiny wood floor. The light from the strand of lights bounced off the walls and floor and reflected back onto Logan, lighting her just beautifully.
Lens
Because I was shooting in a low light situation, I used my trusty 50mm f/1.8 lens, which is one of my go-to lenses. At around $300, it is the lens I recommend for beginners who want to experiment using shallow depth of field and capturing images in low light situations. I use mine ALL THE TIME! Love this super versatile lens! It's perfect for portraits and detail shots in any kind of lighting.
Camera Settings
I knew I was going to have to use a wide aperture; however, I didn't want the depth of field to be too shallow. I chose the aperture of f/2.0 to maintain some detail in Logan's hands and arms while she was moving them back and forth. And speaking of moving, my shutter speed was 1/100 sec to freeze the action. These settings put my ISO at 1000.
Compose & Capture
When Logan started raising her arms, I chose to capture her with a vertical format, which helped to tell the story of her sorting out the lights in the air. I focused on Logan's eyes, then recomposed the shot and clicked the shutter. Voila!
Now some quick tips on how to photography baby with Christmas lights for two other images…
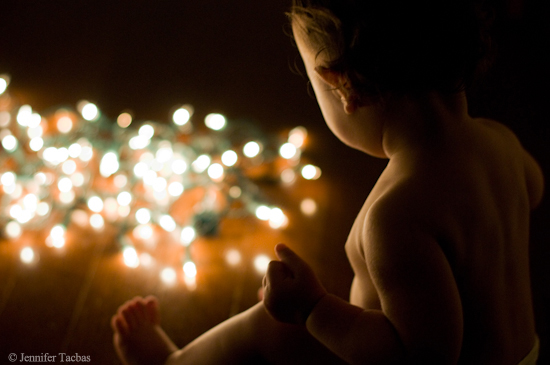
This next image is my favorite of the detail shots. To create this image, I put the whole light strand in front of her on the floor. I sat close behind her and focused on her ear to capture a sharp silhouette in contrast to the blurry, bokeh-licious lights. I think this image captures the wonder of Christmas! Camera settings: ISO 1250, f/2.0, 1/100 sec.

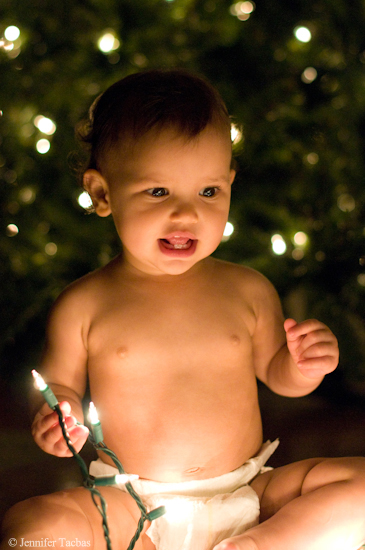
For this last image, I put Logan in front of the Christmas tree. The same single strand of lights was on the floor in front of her. I got close to Logan and focused on her eyes, which were wide with wonder. By sitting close to Logan to take her picture, the lights on the Christmas tree lights transformed into beautiful bokeh. Camera settings: ISO 2500, f/2.0, 1/100 sec.

Now that you've seen how to photograph baby with Christmas lights, it's YOUR turn! Use these tips as a starting point, and then have fun experimenting with Christmas light photos of your own! Try all sorts of things. How does using a multi-colored strand of lights change the image? Do you prefer the amount of light from two strands instead of one? What happens if you put your subject in the middle of a dark room instead of placing them next to a wall? Please post your images to Me Ra's Facebook page so we enjoy your captures and get further into the holiday spirit!
Meet me here next Monday for my second to last First Year post! I will be sharing with you some of Logan's newest milestones. She continues to blow my mind everyday with the new things she is doing!
First Year Cheers!
Jen
*Restart Your Creativity in January with an intimate, rich 5 week online course that Me Ra only offers once a year. This course is for you if you feel like your creativity is in a rut, or you want a jump start to the new year. See the weekly themes, the goodies you'll receive, and all the other juicy details here!
Save
Save
Behind the Scenes Baby Photography With 50mm Lens
Source: https://fioria.us/phototips/first-year-how-to-photograph-baby-with-christmas-lights/
0 Response to "Behind the Scenes Baby Photography With 50mm Lens"
Post a Comment